NECTO Code Assistant Manual
The NECTO Code Assistant is a powerful feature in NECTO Studio that helps users generate code for their embedded projects, especially those built with MIKROE Click boards™ and the mikroSDK v2.0 framework. This manual guides you through the practical use of the assistant, showing how to quickly set up, configure, and run your embedded project.
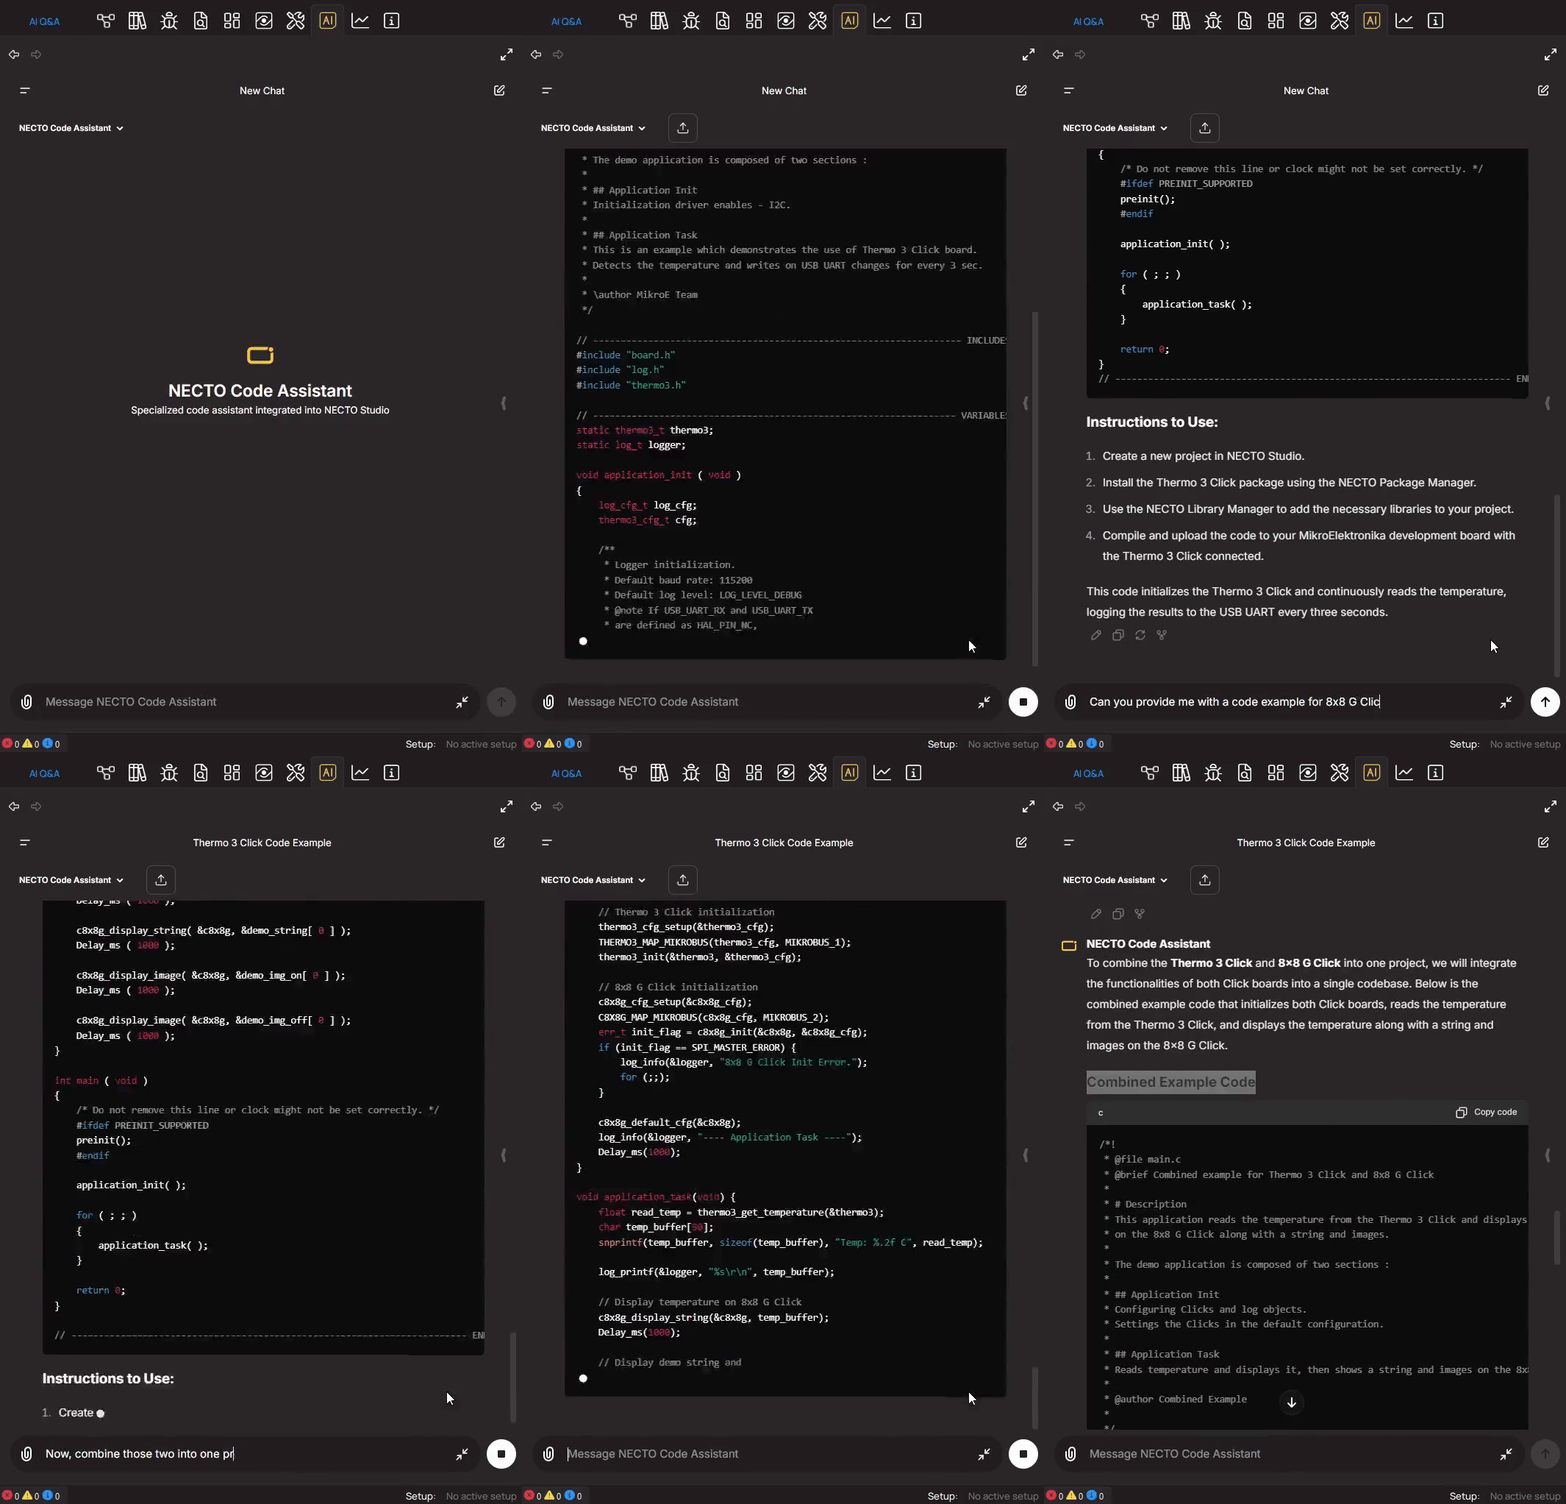
NECTO CODE Assistant in ACTION: Combining Click boards™ for Complex Projects
📌 Reference GIF: 
NECTO CODE Assistant in NECTO Studio is not just a tool for generating code for individual Click boards—it’s a powerful assistant that helps you integrate multiple Click boards into a single, cohesive project. Whether you're combining two or more Click boards™ to create advanced embedded solutions, NECTO CODE Assistant makes it incredibly easy to bring all your hardware components together and generate the necessary code.
When working with multiple Click boards™, the challenge often lies in how to manage the initialization, communication, and functionality of each board while ensuring they work seamlessly together. NECTO CODE Assistant simplifies this by allowing you to:
- Select and configure multiple Click boards™: Choose any combination of Click boards™, whether you're working with sensors, communication modules, or power management devices.
- Automatically generate combined code: Once you’ve prompted the Assistant with particular Click boards™, the assistant will generate all the necessary code to initialize, configure, and manage the interaction between the boards.
- Easily manage data flow: The assistant ensures that the data flows correctly between the boards, taking care of the setup, communication protocols, and any necessary conditions for the boards to interact with each other effectively.
With NECTO CODE Assistant, combining Click boards™ for complex projects has never been easier. It helps engineers, developers, and hobbyists alike quickly generate the necessary code to make their multi-board setups come to life—allowing them to focus on what matters most: building innovative solutions.
Using NECTO Code Assistant for MCU Datasheet Insights
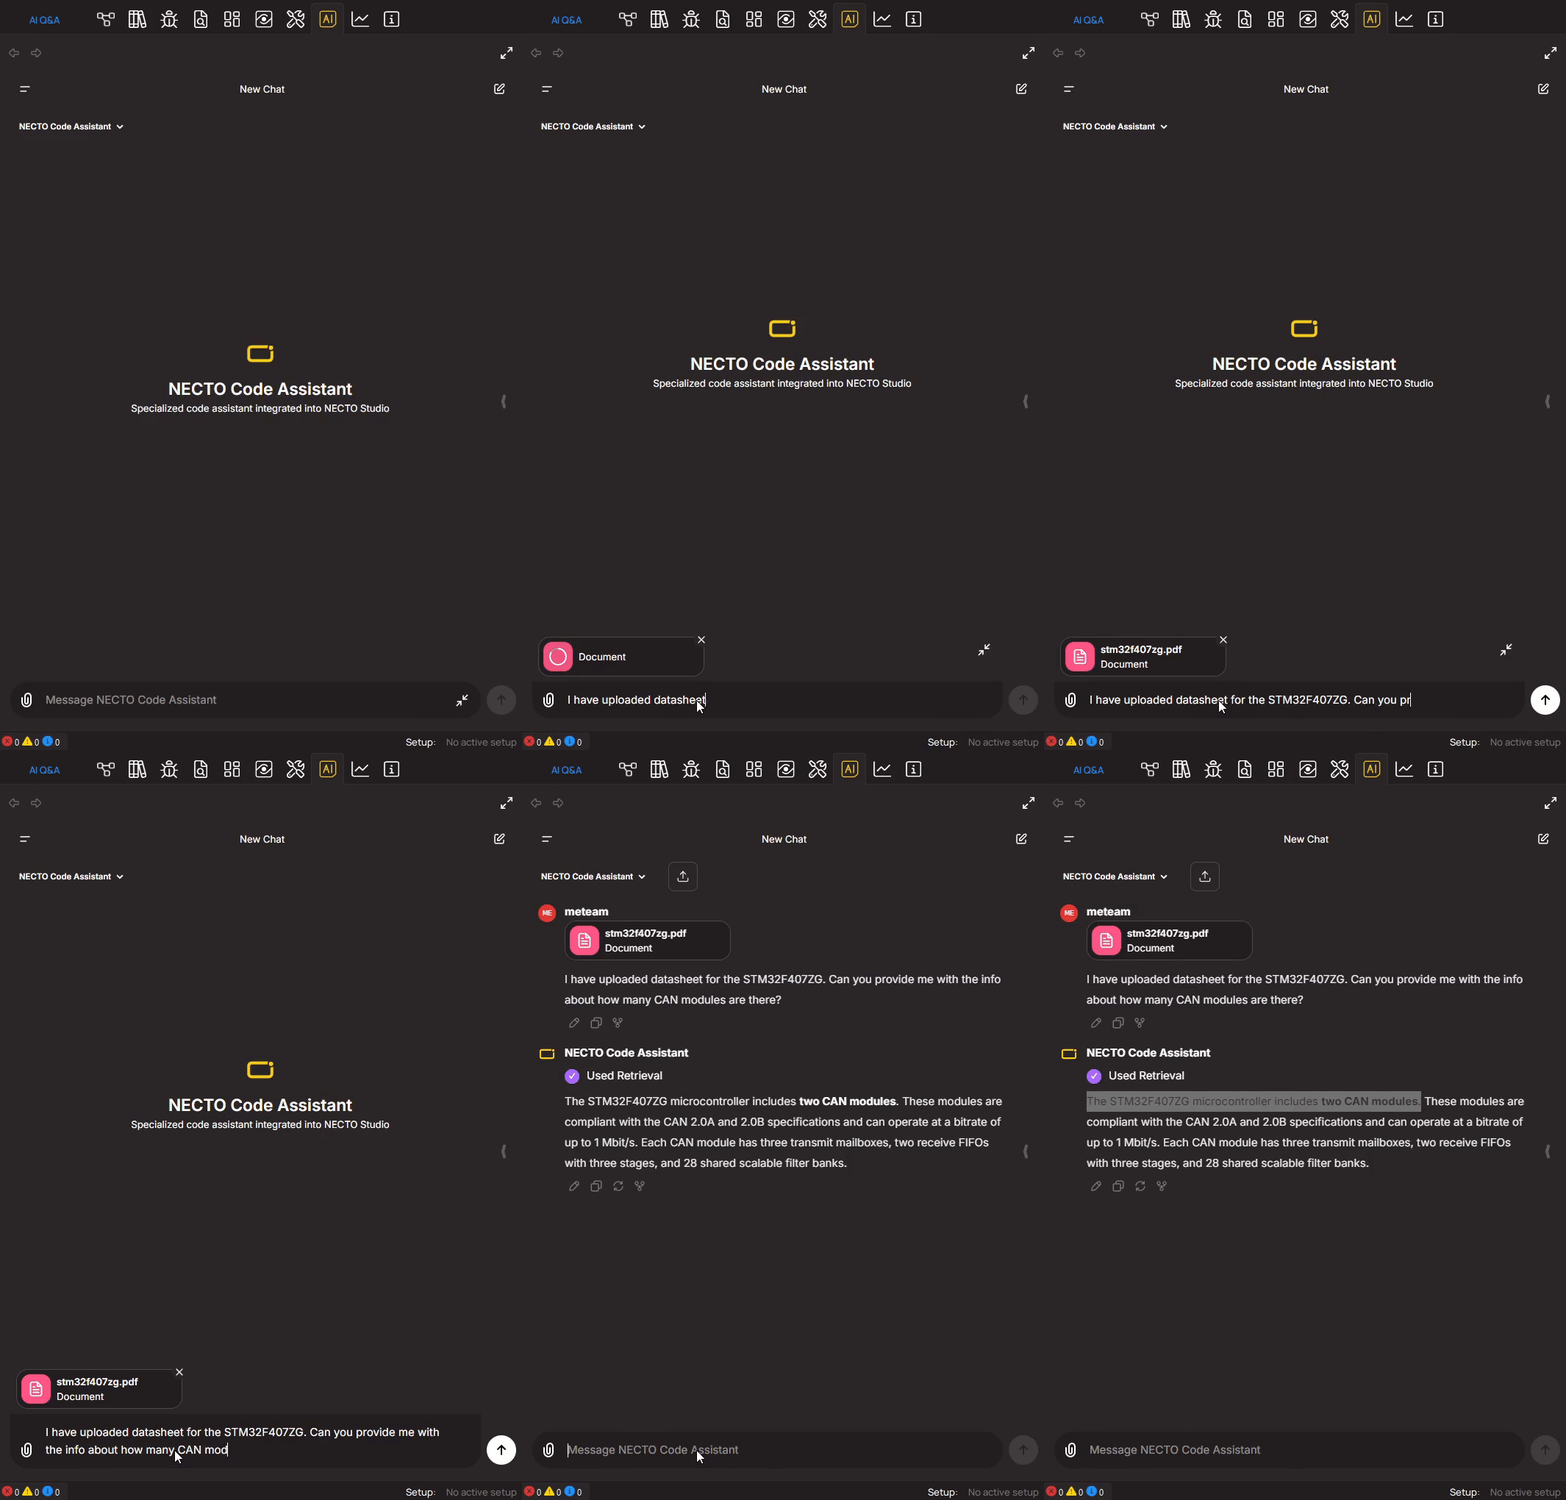
NECTO Code Assistant can help you quickly access and understand key details from your microcontroller's datasheet. By uploading a datasheet PDF, you enable the assistant to provide precise answers to your MCU-related questions.
📌 Reference GIF: 
Step 1: Uploading the MCU Datasheet
- Navigate to the Assistant Panel: Open NECTO Studio and select the Code Assistant tab.
- Locate the Upload Option: Click the Upload Datasheet button.
- Select Your File: Browse your local storage and select the appropriate PDF file.
- Confirm Upload: Click Open, and NECTO Studio will securely upload the document for analysis.
Once uploaded, NECTO Code Assistant will start processing the datasheet, which might take a few seconds.
Step 2: Ask MCU-Specific Questions
After successful upload, you can directly ask questions like:
- "What are the power supply requirements for the STM32F407?"
- "Show me the pinout diagram for the PIC18F45K22."
- "What’s the maximum clock frequency of the ATmega328P?"
- "Explain the ADC configuration for this MCU."
The assistant will extract and summarize the relevant sections of the datasheet, giving you concise, accurate answers without digging through hundreds of pages.
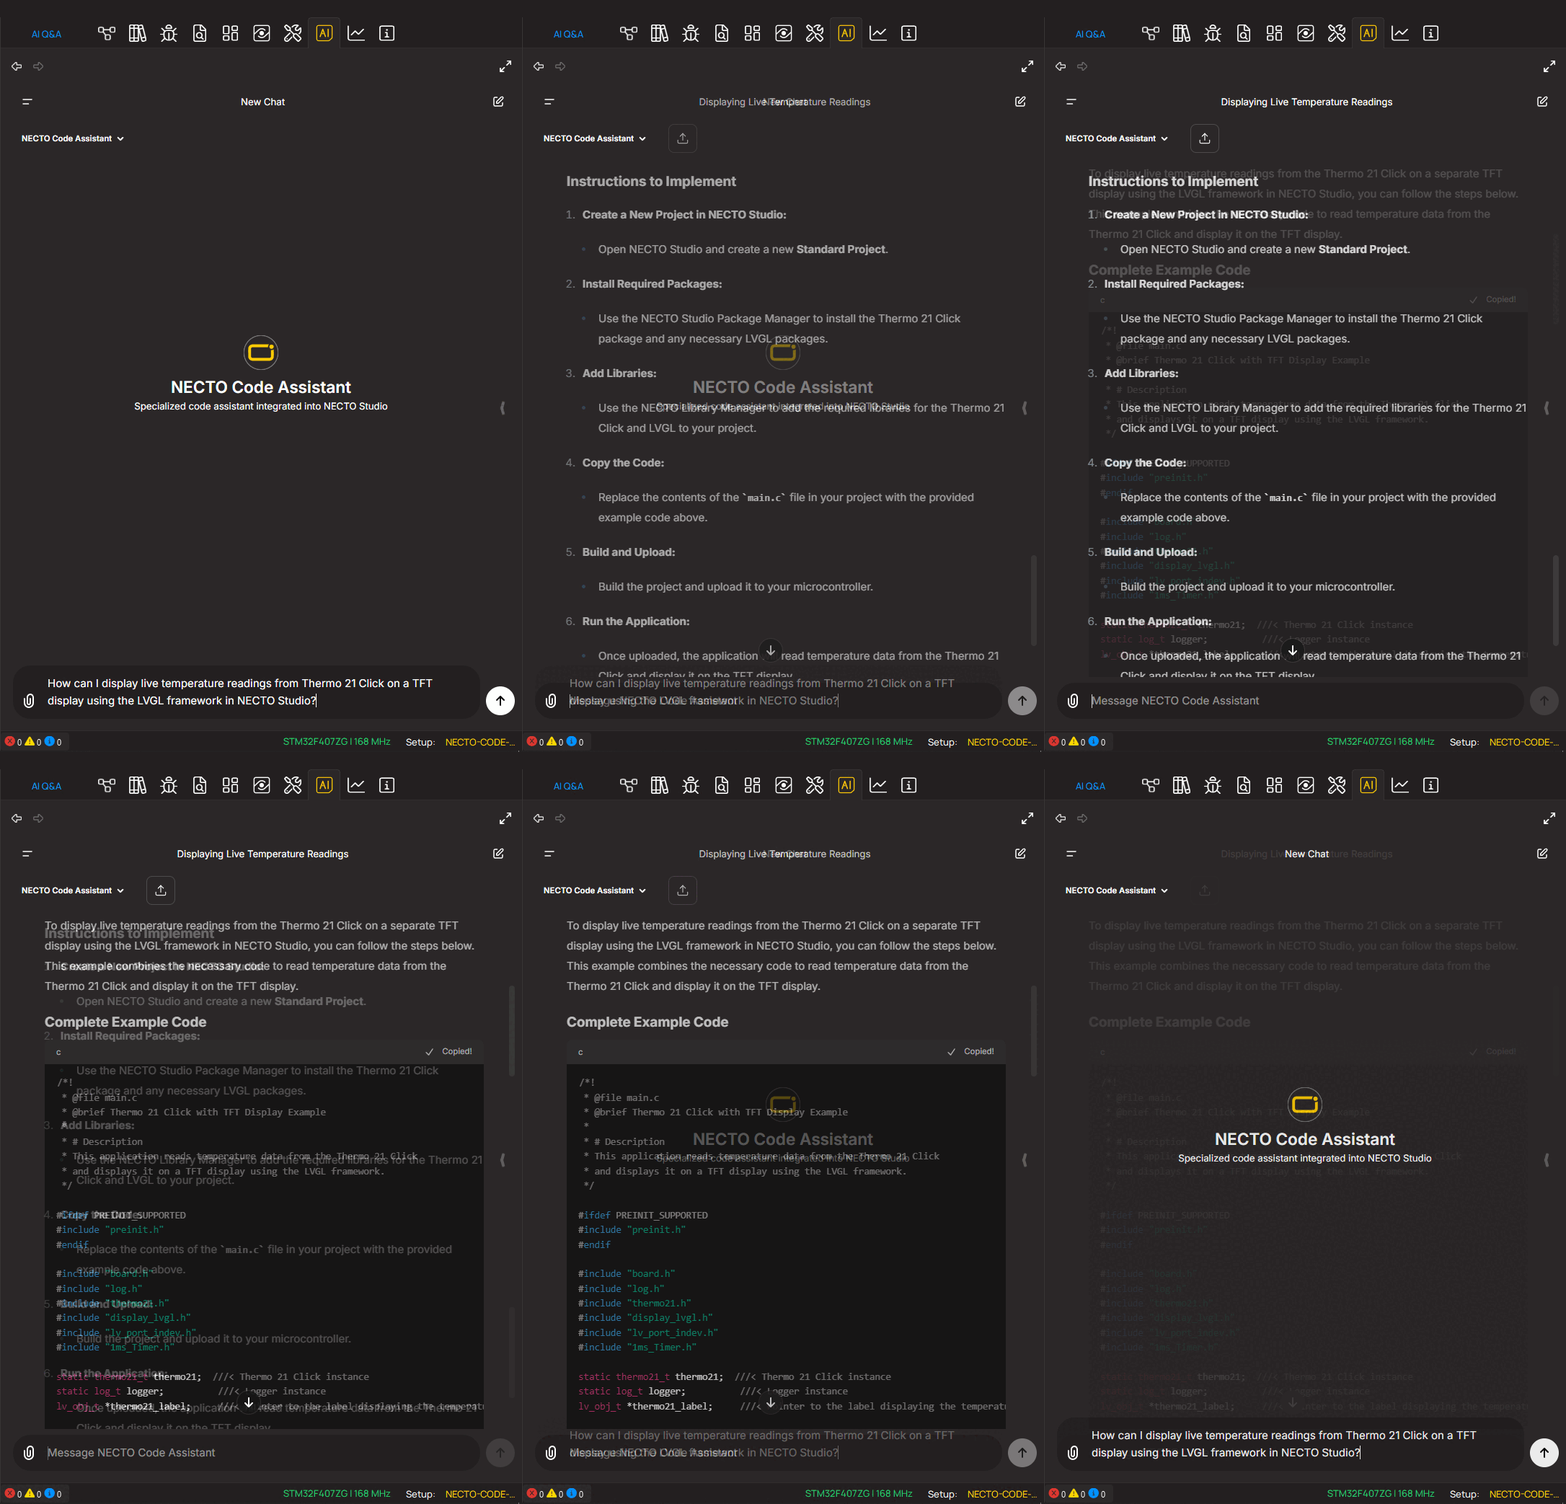
Practical Example: NECTO Code Assistant with Thermo 21 Click and LVGL Graphics
📌 Reference GIF: 
Step 1: Set Up Your Environment
- Launch NECTO Studio.
- Navigate to the
Code Assistantpanel. - Shortcut: Press
CTRL+8. - In the Code Assistant prompt, type the following request:
How can I display live temperature readings from Thermo 21 Click on a TFT display using the LVGL framework in NECTO Studio?
Step 2: Connect to Your Hardware Setup
- Connect your development board (e.g., UNI-DS v8) via USB.
- Place the Thermo 21 Click on MIKROBUS 1.
- Attach a TFT display (e.g., TFT 4.3" Cap Touch) to the appropriate connector.
- (Optional) Open
Planet Debugfor remote testing.
Step 3: Generate and Insert Code
- After asking your question, NECTO Code Assistant will generate the necessary code.
- Copy the generated code to your
main.cfile.
Example generated code:
/*!
 * @file main.c
 * @brief Thermo 21 Click with TFT Display Example
 *
 * # Description
 * This application reads temperature data from the Thermo 21 Click
 * and displays it on a TFT display using the LVGL framework.
 */

#ifdef PREINIT_SUPPORTED
#include "preinit.h"
#endif

#include "board.h"
#include "log.h"
#include "thermo21.h"
#include "display_lvgl.h"
#include "lv_port_indev.h"
#include "1ms_Timer.h"

static thermo21_t thermo21;  ///< Thermo 21 Click instance
static log_t logger;          ///< Logger instance
lv_obj_t *thermo21_label;     ///< Pointer to the label displaying the temperature

/**
 * @brief Update the text of an existing label.
 *
 * This function updates the text content of a given label.
 *
 * @param label Pointer to the LVGL label object.
 * @param text The new text to display on the label.
 */
void update_label(lv_obj_t *label, const char *text) {
    if (label) {
        lv_label_set_text(label, text);
    }
}

/**
 * @brief Create and align a label on the active screen.
 *
 * This function creates a new label, applies default styling, and aligns it on the screen.
 *
 * @param x The x-coordinate offset relative to the alignment.
 * @param y The y-coordinate offset relative to the alignment.
 * @param align The alignment option (e.g., LV_ALIGN_CENTER, LV_ALIGN_TOP_LEFT, etc.).
 * @return Pointer to the created LVGL label object.
 */
lv_obj_t *create_label(int x, int y, lv_align_t align) {
    lv_obj_t *label = lv_label_create(lv_scr_act());
    lv_label_set_text(label, "");
    lv_obj_set_style_text_color(label, lv_color_hex(0x000000), LV_PART_MAIN);
    lv_obj_align(label, align, x, y);
    return label;
}

/**
 * @brief Initialize the board and LVGL related peripherals.
 */
void board_init() {
    lv_init();
    lv_port_disp_init();
    lv_port_indev_init();
    timerInit();
}

/**
 * @brief Application initialization routine.
 */
void application_init() {
    board_init();

    log_cfg_t log_cfg;
    thermo21_cfg_t thermo21_cfg;

    LOG_MAP_USB_UART(log_cfg);
    log_init(&logger, &log_cfg);
    log_info(&logger, "---- Application Init ----");

    thermo21_cfg_setup(&thermo21_cfg);
    THERMO21_MAP_MIKROBUS(thermo21_cfg, MIKROBUS_1);
    if (SPI_MASTER_ERROR == thermo21_init(&thermo21, &thermo21_cfg)) {
        log_error(&logger, "Communication init.");
        for (;;);
    }

    // Create the temperature label centered on the screen.
    thermo21_label = create_label(0, 0, LV_ALIGN_CENTER);
}

/**
 * @brief Application task loop.
 */
void application_task() {
    float temperature = 0;
    if (!thermo21_temperature_read(&thermo21, &temperature)) {
        char buffer[50];
        snprintf(buffer, sizeof(buffer), "** Temperature : %.2f C", temperature);
        log_printf(&logger, "%s\r\n", buffer);
        update_label(thermo21_label, buffer);
    }
    Delay_ms(1500);
}

/**
 * @brief Main entry point of the application.
 */
int main(void) {
    #ifdef PREINIT_SUPPORTED
    preinit();
    #endif

    application_init();

    while (1) {
        lv_task_handler();
        Delay_ms(5);
        application_task();
    }

    return 0;
}

static volatile uint32_t msCount = 0;
INTERRUPT_ROUTINE
{
    msCount++;

    if (5 == msCount) {
        msCount = 0;
        lv_tick_inc(5);
        process_tp();
    }
    CLEAR_FLAG;
}
Step 4: Install Required Libraries
- Open the
Package Manager. - Shortcut: Press
CTRL+5. - Search for and install the following packages:
- Thermo 21 Click library.
- Verify and Check library installation under the Library Manager.
- Make sure Thermo 21 Click library is checked.
- Make sure Board - (Board-specific library) is checked.
- Make sure Log - (Board-specific library) is checked.
Step 5: Run and Test the Application
- Build the project.
- Shortcut: Press
CTRL+B. - Flash the code to your development board.
- Shortcut: Press
CTRL+SHIFT+P.
Observe live readings on the TFT display!
Advanced Code Assistant Capabilities
Ask for Optimizations
You can ask for optimizations or enhancements to your code. For instance:
Ask for Additional Features
You can expand your project by adding more Click boards or GUI elements:
The assistant will generate the appropriate logic, such as:
if (temperature > 30.0) {
    lv_label_set_text(alert_label, "WARNING: High Temperature!");
    lv_obj_set_style_text_color(alert_label, lv_color_hex(0xFF0000), 0);
}
Why Use NECTO Code Assistant?
- Time-Saving: No need to manually browse through documentation.
- Accurate Solutions: Code is tailored to your specific board and Click modules.
- Interactive Debugging: Quickly test and refine your project with Planet Debug.
Final Thoughts
The NECTO Code Assistant transforms embedded development, enabling engineers to focus on innovation rather than boilerplate code. By integrating with the vast MIKROE ecosystem, the assistant streamlines the development of complex projects with real-time, device-specific code generation. This tool boosts productivity and makes embedded development faster, smarter, and more enjoyable.
🚀 Try it out today and bring your embedded projects to life with just a few clicks!
Using NECTO Code Assistant for MCU Datasheet Insights
NECTO Code Assistant can help you quickly access and understand key details from your microcontroller's datasheet. By uploading a datasheet PDF, you enable the assistant to provide precise answers to your MCU-related questions. Let’s walk through the process!
Pro Tips for Best Results
- Use Official Datasheets: Upload manufacturer-provided documents for the most accurate data.
- Ask Clear, Specific Questions: The more precise your question, the better the response.
- Check for Updates: Keep your datasheets up to date to ensure you’re working with the latest specs.
⚠️ Important Note
NECTO Code Assistant can make mistakes. Test the generated code in real scenarios before deploying it. Look out for missing edge cases that NECTO Code Assistant might overlook.